In this guide I will teach you how to set up a Discord server, including roles, permissions, a welcome portal, channels and subchannels, and bots! Note that this is the beginner to amateur guide, so if you’re looking for ways to amp-up an already great server this probably isn’t the guide for you. Otherwise, you need no knowledge at all to follow this guide 🙂
0. Discord EXTREME BASICS
Discord is a chat app designed for gamers. It’s available on PC, mobile, Xbox, and Playstation. (It is not currently on anything Nintendo. They wanted to, but the decision is still on Nintendo.) There’s an app and an online version (discord.com). Both are good. The app is better for notifications, the online version is better for not wearing out your battery.
- Accounts: You can see your account info and settings button at the bottom left. Click the gear to see your settings.
- Get to the Home Screen at any time by clicking the Discord icon at the top left.
- Friends: There are two ways to send a friend request. If you know their Username, you can go to the home screen and click the green Add Friend button at the top. Note that it is CaSe SeNsItIvE. The other option is when you see someone’s username in a chat channel, Right Click on their username and click Add Friend. When you get friend requests, you can see them by going to the home screen and clicking Pending at the top. If someone adds you and you don’t get the request, make sure they have your Username correct (See yours at the bottom left) or try adding them instead.
- “Direct Message” (DM) vs “Server” vs “Channel”:
- “Direct messages” are like normal texting. You can message one person directly (hence the name), or create a group chat between multiple people. Direct messages are not meant to be complex. If you click the Discord icon (or on mobile, it’s a chat bubble) at the top left, it will take you to your home page, where you can see a list of your friends (whom you can direct message) and any groups you are in in the column second from the left. The “find or start a conversation” bar will let you search through them- or you can make a new group message by clicking the chat bubble button that has a + on it (beside the search bar).
- “Servers” are communities you can join, and they include “Channels,” which are smaller chat rooms you can hop in and out of. Think of them like going from room to room in one big house. Servers are always shown as icons on the leftmost side of the screen. Create one or join one (if you know the invite code) by clicking the + circle, or click the compass to explore public servers. When you open a server, the server’s channels (which are organized into categories) replace the second column on the left. Remember you can always go back to the home screen using the discord icon (or the chat bubble icon if in mobile) at the top left.
- Fancy Text: Some cool stuff you can do when texting:
- To Italicize, put one asterisk (*) on both sides of a text *like this.*
- To bold, put two asterisks (**) on both sides of a text **like this.**
- To underline, a 2 underscores (__) on both sides of a text __like this.__
- To
strikethrough, add 2 tildes (~~) on both sides of a text ~~like this.~~ - To combine them, simply add each one!
- ***Bold italics***
- __*Underlined italics*__
- __~~***
All***~~__ - Etc
- If you are actually wanting the * _ ~ symbols to show up, just put a backslash ( \ ) between everything. *\*\*\like this\*\*\*
- You can Put stuff in a Box by putting one backtick (
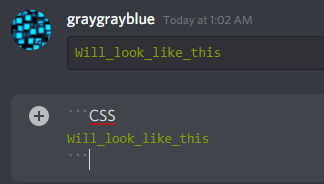
) on each side. Adding 1 to each side `like this` highlights the text in black. Adding 3 to each side insteadputs it in a solid box. (See the picture below). - Want to add multiple lines to the same text message? Hold shift and hit enter.
- How to Color Words:
- Note: This messed with the coding, and because it’s not necessarily supported technically, it may have issues.
- First, type 3 backticks (“`)
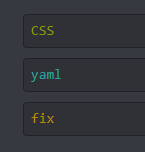
- Next, add the desired cvolor’s code (in the picture example below, I used CSS)
- CSS = Solarized green
- yaml = solarized cyan
- fix = solarized yellow
- md = solarized blue (doesn’t always work)
- glsl = solarized orange (doesn’t always work)
- diff = solarized red (doesn’t always work)
- Then, add a new line to the same text. If on a computer, use shift and enter. If on mobile, just hit enter (not send).
- Write the text you want to be affected. IMPORTANT NOTE: They have to be connected by something other than spaces. You_could_use_underscores, you.could.use.periods, you-could-use-dashes, etc.
- Add another new line (again, shift and enter if on computer, or just enter if on mobile)
- All 3 more backticks (“`)
- Send! See the picture below for an example.
1. Start your Server
- To create your server, from the home screen, look at the leftmost column. Click the circle icon with the +, then either click “Create my own” or choose one of the presets. Choosing a preset will start you off with a couple basic rooms, all editable. Most presets are generically similar with the exception of a couple name changes. I prefer to start from scratch by clicking “Create my own.” It will ask for an icon, a name, and to check the box if it’s for a community. Anything you enter or don’t enter here can be changed at any time. You can also find other people’s templates on the web.
Tip: You can always create a practice server to mess around with and delete after you’re done. People can’t join servers without a link, so there’s no risk. To delete a server, right click on the server’s icon (in the left column), click Server Settings > Overview, then “Delete server” at the bottom left. It will simply ask you to type the name of the server to confirm you want to delete it.
Customization Basics: (Remember to hit Save if you change any settings!)
- Server Settings: Right click on your server’s icon and click Server Settings. From the Overview tab you can… Change icon, Change server name, Select server region, and Change default notification settings (this one is helpful for communities- scroll down, change it to Only @mentions). Hit save!
2. Set up Roles & Moderation
Before creating channels, we need to edit wo can join, what they can’t do, and what privileges certain members have.
Roles & Mentions: A role is like a title or job. For example, you could have @everyone, @member, @helper, and @admin, or you could be creative, like @everyone, @cowboys, @llamas, @spacemen, etc. @everyone includes every single person who has a link to your server. Everybody has this role automatically. Any other roles you want to have have to be added and set up by you… they also have to be Assigned by you or by someone else who has the permission to do so. For example, you could set it to only @admin people can assign roles to others. So how do you do it?
- Create & Color Roles (Step 1): Go to Server Settings (right click on server icon, click server settings) > Roles. On this page, the top left says “Roles,” has a + sign, and says @everyone below it. Click the + sign to add a role. With the role selected, go ahead and give it a name and a color. Ignore everything else until you have all your roles made, named, and colored. To delete a role, scroll over it on the list, click the 3 dot icon, and click Delete.
- Reorganize Roles by Importance (Step 2): From the same menu, you now have to organize your roles based on how important they are. Click and drag them in the list to reorder them (don’t forget to save!) The higher the role is, the more important and more powerful it is. People’s names will be shown in their highest role’s color (for example if somebody was @helper (red) @shoe shiner (green) and @legendary hero (purple), their name would be purple because legendary hero is at the top of the importance chain). Nothing can be below @everybody, and @everybody cannot be deleted.
- Assigning Permissions to Roles (Step 3): From the same menu, select a role in the list and scroll down. You’ll see a bunch of switch buttons. These are the role’s permissions. Edit them, and don’t forget to hit save. Also, don’t forget to edit permissions for @everyone! These are the permissions people start with as soon as they join, so keep them low! Here’s a list of possible permissions for roles that you can give:
| Display role separately from online members | Within your server, on the right, a list of all your server’s members is shown. If this permission is on, then this role will be shown at the top. So instead of your list saying “Online Members” and listing everybody, for example, it might list Admins (whether they’re on or offline) and then all Online Members. |
| Allow anyone to @mention this role | Anyone can say @admin (or whatever the role is) to push notifications to this role if this permission is turned on. Turn it off if you don’t want this role to be constantly annoyed with random messages (I recommend leaving it off) |
| Administrator | DO NOT AUTOMATICALLY TURN THIS ON FOR YOUR MODS / ADMIN. This is basically a “God mod” or Creator permission. It gives your role all permissions no-matter-what, regardless of other limitations placed in your server. This should only ever be given to somebody you’d trust to take over running the server if you were away. |
| View audit log | The audit log is a log of what changes have been made to the server’s settings. View it from Server Settings > Audit Log. If this permission is on, this role can view the audit log. It’s unnecessary except for mods. |
| Manage server | Permission to change server’s name or change regions. Less powerful god-mod permission. Only give it to the person you’d trust to run things if you disappeared. |
| Manage roles | Permission to create, delete, edit, and assign roles that are not as powerful as this role (ex. @mods can’t edit any role higher than @mod). Assign this to trusted admin. |
| Manage channels | Permission to create, delete, and edit channels and channel permissions. Assign this to trusted admin. |
| Kick members | Kicking a member from a channel is like a warning that they did something bad. They can hop back on immediately. Grant this permission to let this role kick members. To kick a member, right click on their username and click kick member. |
| Ban members | Banning a member from a channel kicks them out permanently until someone goes into the banned list and unbans them. Grant this permission to let this role ban members (only of channels, not of the whole server). To ban a member, right click on their username and click ban member. To unban people, go to server settings > ban. |
| Create invite | Allows this role to create a link to the server to send to whoever they want. |
| Change nickname | You have your username throughout all discord, and your nickname within servers. Automatically it is just your username, but with this permission, you can change yours yourself. |
| Manage nicknames | ^^ (See change nickname for more info) Allows role to change other’s nicknames for them. |
| Manage emojis | Allows role to edit, add, and delete server emojis. To do this go to server settings > emojis. |
| Manage webhooks | Webhooks are automated messages and updates sent to the group by a robot. (For more info on these, see bots and webhooks below). This permission allows this role to access, add, delete, and edit webhooks (to do this, go to server settings > integrations) |
| Read text channels & see voice channels | This permission should be on. It allows people to see your channels. End. The only reason you’d turn it off is if you had like a punishment or banned role or something. |
| Send messages | Allows role to text in channels. |
| Send TTS messages | Allows role to send text-to-speech messages in texting channels. Everyone who is in the channel will hear their message, like a voice channel, only not live. |
| Manage messages | Allows role to delete others’ messages or pin messages. Give this to mods and such. |
| Embed links | Allows role to send a link to another website, etc. |
| Attach files | Allows role to attach a picture, etc. |
| Read message history | When they hop into a channel, this permission allows this role to see messages that were sent before they showed up (this can be changed per channel. Generally here it should be left on). |
| Mention @everyone, @here, and all roles | Allows role to mention @everyone and @roles. Mentioning people sends push notifications to them. This is annoying to grant to Everybody, as Everybody Else will get mass amounts of unnecessary notifications. |
| Use external emojis | Allows role to use other emojis (from another server, for example) besides your server’s and the generic emojis. |
| Add reactions | A reaction is like a gasp, heart, thumbs up, etc on a message. With this permission, this role can -start- reactions on a message. Other people (without this permission) can react to a message that’s already been reacted to. This permission kind of just allows messages to be reacted to. |
| Connect | Allows role to join / listen to voice channels. |
| Speak | Allows role to speak in voice channels. |
| Video | Allows role to stream from voice servers (like gamers do when they hop on with all their friends and then livestream or post it to youtube, etc) |
| Mute members | Allows role to mute other members (mute yourself by clicking the mic icon at the bottom left. Mute others by right clicking on their username and clicking mute. Muting prevents them from speaking.) |
| Deafen members | Allows role to deafen other members (deafen yourself by clicking the headphone icon at the bottom left. Deafen others by right clicking on their username and clicking deafen. Deafening prevents them from hearing.) |
| Move members | Allows role to pick up members and move them to other channels (both the picker-upper and thou being picked up must have access to the new room). To do so, right click on their username, click move, then click the desires new destination. This helps members find the right place to be, but can also be used to be rude. |
| Use voice activity | Voice activity is “As I speak, it is sent.” Push to talk is “I hold a button down to speak and have it sent.” This permission allows this role to talk freely without putting extra effort. This is good to turn off for people who have two much background noise, forget to mute, etc. It it not good to turn off if it’s a game-chat room, or something else where they cannot actively unmute themselves. |
| Priority speaker | In voice channels, those with this permission will sound louder than the rest. Other people’s volumes will be lowered while priority speakers are talking. |
Moderation: Moderation is your member safety baseline program. To get to these settings go to Server Settings > Moderation. There are 3 areas:
- Verification level is what is required of member accounts before they can comment / join chat channels. It is automatically set to unrestricted. It is highly recommended to set Some restriction so you don’t get any ad bots. You can set it to (option 1) require a verified email minimum, (option 2) require a verified email for longer 5 minutes, (option 3) require verified email for 5+ mins Plus have been on the server for more than 10 minutes, or (option 4), All of that Plus a verified phone number. Option 4 is the most safe against bots and fakees, but option 1 is still pretty secure.
- Explicit media content filter filters media (pictures, gifs, other attachments, etc), not texts. There’s a different text filter you can set on each channel for texts later. Again, it is automatically set to no filter. A filter is recommended for public servers. Your options are (1) Scan content from members without an assigned role (better used for when you personally know your members), or (2) Scan everybody (better used for public servers).
- 2FA requirement for moderation: When set up, this requires roles who have moderation privileges (such as kicking / banning members, etc) to have a 2-Factor Authentication on their account before doing things, just in case they get hacked. This is recommended for Huge, public servers with power, not big servers that aren’t big companies. This setting can only be applied and removed if you, the server owner, set up 2FA on your own account first.
3. Set up Categories, Channels, and Advanced Permissions
Now it’s time to add your categories and channels. Don’t worry about permissions just yet, just name them and get them out there.
A category is a folder of similar channels, while channels are the actual chatrooms. To create either, right click on your server icon and click “Create category” or “Create channel.” You will be asked to give it a name, and whether it will be private or not. If marked private, not everybody can see it. If you choose private, your next box will ask you to choose which of your added roles can see that category or channel. (Note: If a category is marked private, all channels in that category will also be private under those same allowed roles. However, a public category can have private categories.) Once you have your categories and channels, you can drag them up and down in the list to the left. Put channels under their categories and move categories to the order you like. (To delete either, right click on it and click Delete Category / Delete Channel)
- Category settings: Right click on a category and click “Edit Category” to see its settings. From here you can change its name. If you go to category settings > permissions, you can change which roles can see this category and its advanced permissions (which will both effect the channels in this category). We’ll get to advanced permissions next. You can collapse categories by clicking on them.
- Channel settings: Right click on a channel and click “Edit Channel” to see its settings. Here you can change the channel’s name, add a description/topic, slowmode, and NSFW. Slowmode is when you don’t want people spamming a channel (roles with manage channel or manage messages permissions are exempt). Scroll the bar over for how many seconds or minutes members have to wait before posting. If you mark a channel as NSFW, members must prove that they are of legal age, and the explicit content filter does not apply. Go to channel settings > permissions to edit which roles can view this channel / change its privacy, to sync a channel to its category’s permissions, and edit its advanced permissions, which we’ll get to next. You can change a channel’s notification settings by right clicking on it from the list and scrolling over notification settings. If you get a channel you set up -perfectly-, you can duplicate it if needed by right clicking on it from the list and clicking Clone Channel.
Advanced Permissions are permissions set to specific categories and channels. These overrule role settings. To get to these, go to your category or channel settings > permissions > click Advanced Permissions. These are the same permissions are listed in the chart above. You can edit permissions for @everyone or for individual roles (choose from the list to the left). Note that instead of a flip switch you now have an X, a /, and a Checkmark. The X is Off, the Check is On, and the / is “Leave it as it is set for this role already.”
| Goal: Create a welcome area where newbies have to read the rules and get approved before seeing other channels | How to set up: 1. Your @everyone role will be for Newbies. Create an @member role for approved members. 2. Turn every permission for @everyone to Off, except for Send Messages and Embed Links. Your permissions for @member can be whatever you want. 3. Make every category and channel private -Except- your welcome area rooms. “Welcome area rooms” should at least include a rules channel and a registry channel (make sure these are 2 separate channels). You might also wish to include News or other channels to be public. 4. Make sure your “rules” channel’s permissions are set so that only mods or you can comment. You may also wish to do this for your “news” channel or similar channels. 5. Make your registry channel private. Only @everybody can see it, and whoever can approve them (such as the mods) can see it. @member should not be allowed to view channel (this way the channel disappears once they’re approved). If you want to, set the registry channel’s permission to not allowed @everyone to “read message history” / “read past messages.” This way they won’t see everyone else’s registry requests (which is especially beneficial if they need a “code word” to get in.) How to use: All mods have to do is enter the channel and review one’s entry, then right click on their name, “edit roles,” and give them the @member role. |
4. Webhooks and Bots
Next we’re going to get your server to work for you- by using webhooks and bots. We’ll start with webhooks because it’s shorter, -but- you’d Don’t need webhooks, you Do want bots. And they’re a lot easier to set up than you think.
Webhooks are automated messages sent to one of your Discord Channels. These are good for updates and keeping people entertained and involved. Note that these are optional, you really -don’t need one,- but it is pretty helpful for keeping channels active. What you will do is fetch a link from Discord and feed it into a third party program, and that third party program will send automated messages to your desired channel. The program I’ll use is GitHub. There’s also CircleCl and DataDog if you’re looking for something different.
- In Discord, go to your Server Settings > Integrations. Click Create Webhook. Give your webhook bot a name and a picture, then choose which channel you want it to post to (for example, “Announcements”). When you’re ready, click copy webhook URL. Don’t forget to save your changes!
- Go to github.com. You’ll need to make an account, verify the email, and log in. Then you can create a repository. (If you just made your account, the option should be noticeably visible. If not, click on your account picture at the top right > Your Repositories > New. This is also how you can see your repositories later.) Name it whatever you want (I just named mine Discord or something), make it private, and click create.
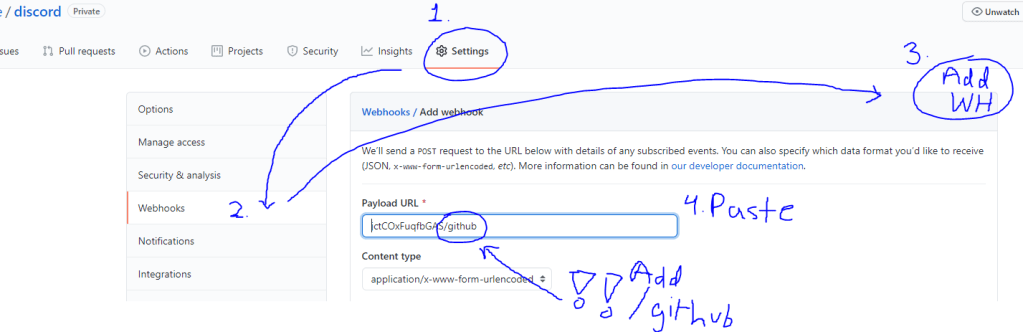
- You’ll see some whacky stuff. Ignore it. There’s a bar in the middle of the screen with categories: Code, issues, pull requests, etc. Click settings. Now in the bar to the left click Webhooks. Then click Add Webhook. (There’s a picture for this step below)
- Paste the webhook link (that you got in step 1) to the Payload URL box. IMPORTANT!!: Add /github to the end of your link! IT WILL NOT WORK IF YOU DON’T. (Error 400? You probably left it out. If not, try re copying and pasting the link.) Set the application type to application/json (Discord likes it better), and select “Send me everything.” Now click Add Webhook.
- That’s it. Your webhook will now tell that channel random stuff like when things have been starred or leveled up or whatever. It’s really not that important, but it is pretty cool for a basic bot.
Now the more fun part:
Bots are fake accounts that post stuff to your channel, like webhooks, but much more customizable. Note that you can pretty much either go to a third party website that has bots and just use this method to add one that’s already set up, or if you know or want to learn coding, you can use other third party websites for that too. Option one is much more simple and easy to use.
Using other people’s bots (option 1, simple, easy to do): (thanks youtubers for the recommendations lol)
| What it is, Set up difficulty | Instructions | Cool features & how to use |
| MEE6 mee6.xyz EASY | Go to the website, click add to discord, choose your server, allow, give permissions & authorize, prove you’re not a robot. DASHBOARD (To return to dashboard later, go to the website, click add to discord, instead of choosing a new server click go to dashboard.) Click the command on the dashboard that you want to add! DON’T FORGET TO SAVE Note that some features require premium. | Custom commands: Custom command > text command All commands start with !, for example !darthvader. That means when someone texts !darthvader, this command will happen. Levels: Talking in the server earns XP that gains levels! If your server is a big community, I recommend setting the level up announcement to a custom channel. Members get mentioned when they level up. If they type !rank they can see their level ranking. Welcome: Send an automated public or private message to new members, automatically give new members a role, and/or send a message when someone leaves. |
| Pingcord Pingcord.xyz EASY | Go to the website, click sign in to pingcord, allow, choose your serve, click continue twice, give permissions & authorize, prove you’re not a robot. DASHBOARD Once logged in you can choose for which server’s bot you are editing at the top right under my servers. On the left choose which service you want to share notifications for. DON’T FORGET TO SAVE Note that some features require premium. | Shares when you, a channel, or an account go live or post Choose which social media (twitch, youtube, facebook, etc) you want to create notifications for. Add your account and what you want the bot to do / say, as well as where to send it. I recommend choosing an updates channel or something to keep notifications out of the way. |
| Dyno Bot Dyno.gg Easy to use, Easy to get lost | Go to the website, at the top right click login with discord, authorize. Choose your server. Click continue, give permissions & authorize, prove you’re not a robot. DASHBOARD Change servers by clicking manage servers at the top right. Use the left column, including Modules and everything below it, to edit what dyno does (see right >>) DON’T FORGET TO SAVE Note that some features require premium. | Some stuff you can do… Automod, use custom commands for auto FAQ, autoroles, etc. There’s a lot of fancy complex things you can do with dyno bot if you take the time to explore it. Inspiration: – Auto-FAQ: Use autoresponder to identify when someone asks a common question like “how do I become a mod,” and it will auto reply the answer. You can set up a bunch of these and have the bot send links to the answers on different sources, etc. – Autoroles: Use autoroles to give additional roles such as “roleplay request,” “currently streaming,” etc. They could say Roleplay request and the bot will show them in a list to the right (if the role is set up to be shown separate from online members). You can also set it to have the bot remove these roles after a certain period of inactivity. |
Setting up your own bot (option 2, coding, more complex):
- Go to discord.com/developers (in your internet browser, and make sure you’re logged in to your personal account that you made the server with).
- You’ll automatically be in the applications category. At the top right, click New Application. Give your new bot a name! You’ll also be able to add an icon and description in the next page. Each application is a fake account on Discord, so you may choose to have multiple applications if you want your bots to look different.
- In the left menu click Bot. Then click Add bot. This lets your fake account post and do stuff. Important note: Here you’ll be able to reveal, copy, and share your bot’s token number. Don’t do it. If it get’s out, regenerate the token number immediately. This is how hacking happens.
- Turn off “Public Bot.” Now only you have the ability to add your bot places. Others can’t use it.
- Now you can go add basic permissions to your bot. I usually keep it simple with a variation of Manage roles (to assign roles when needed), kick members, send messages (pretty much a must have), embed links, read message history (also a must have), and add reactions. Don’t forget to save!
- Time to add your bot to your server. First, copy this address… https://discordapp.com/api/oauth2/authorize?scope=bot&client_id=XXX ~and paste it in a new window (but don’t hit enter yet). Now go back to your bot tab and click general information (on the left). Under the description box it says Client ID. Hit copy. Now go back to your new tab and replace the XXX from that address with your new link. NOW you can hit enter.
- An authorize access tab will pop up. Choose your server from the dropdown menu. You will do this (step 6 and 7) for each server you want to add your bot to. Click authorize, confirm you are a human, and close the tab. Now your bot is shown as a member.
- You can then use github or other sites to design code to plug into your bot. This is how you design your bots -from scratch,- and you’ll need to find some other tutorial on how to do that causeee I don’t really have the confidence to teach coding right now lol Maybe later
5. Polishing, Testing, Sharing
SO YOU NOW HAVE your customized server with roles, different channels for different purposes with different settings, and BOTS to help with moderation and assisting your members. Now you share the link (to invite people, right click on your server icon and click invite people. You can copy the link which will expire soon, or click edit link at the bottom to get a link that doesn’t expire for permanent sharing). I recommend having some close friends, maybe the other mods, or another account created by you to hop into your server and make sure the welcome channels and bots run smoothly.
-If something goes wrong,- be Discord-minded! Is it because the account you are in does not have the right role? Does that role not have the right permissions? Are those permissions wrongly blocked in the current channel? Is the channel under the wrong category? Do the bots have access to the channel? Do they have the right permissions? Which bot site did you use that you’d need to access to fix the problem? How can handle the situation without freaking out? Doing these will help you build a towering community that people love to be in. Then all you have to do is share the link.
~~~Thank you!! Comment your questions!!~~~
