
Dragon Mania Legends has by far, in my opinion, the best battling system ever known to dragon and monster games. If you’ve played, you know winning involves having the right team, the right training, and the right strategies. This can be difficult to master, but not if you have help! In this guide I am going to give tips and tricks on how to build and better your dragon teams to withstand any type of battle.
Step 1: Understand the Elements
Each dragon consists of one or more of the following 12 elements: Fire, Wind, Earth, Water, Plant, Metal, Electric, Void, Dark, Light, Legendary, and Divine. This effects what skills they can learn and who they can best hurt (and be hurt by) in battle.
Below is a chart explaining the order of elements.
| Strongest against | Weakest against | (Level 1-5) Skill Title | Skill Description | (Level 6) Added Option 1 | (Level 6) Added Option 2 | |
| Fire (Unlocked on level 1) | Wind | Fire Electric | Explosive Results (Offensive) | Deals additional damage to all other opponents | Hot Coals: Killing the target will further damage other opponents | Slow Burn: Works like poison on target over 2 turns |
| Wind (Unlocked on level 1) | Earth | Wind Void | Dark Clouds (Offensive) | Reduces target’s attack damage over 2 turns | Storms-a-Brewin: Reduces all other opponents’ attack damage as well over 2 turns | Last Breath: Reduces target’s attack damage over 4 turns instead of 2 |
| Earth (Unlocked on level 4) | Water | Earth Metal | Stone Shield (Defensive) | Absorbs damage for all allies over 2 turns | Stone Cold: Target stays alive for 1 extra turn after being defeated | Tombstone: Shield remains for 4 turns instead of 2 |
| Water (Unlocked on level 9) | Fire | Water Plant | Revitalize (Defensive) | Heals target and all other allies | Restorative resource: Removes bad effects from target ally | Regeneration: Restores extra health to target over 2 turns, before bad effects such as poison are applied |
| Plant (Unlocked on level 11) | Void | Plant Light | Poison (Offensive) | Deals extra damage over 2 turns | Infection: If an opponent effected with infection dies, poison spreads to all other opponents | Pandemic: Poison lasts 3 turns instead of 2 |
| Metal (Unlocked on level 15) | Plant | Metal Dark | Vengeful Sword (Defensive) | Deals back damage to attacker when ally is hit | En Garde: Absorbs incoming damage as well | Final Vengeance: If the ally targeted with final vengeance dies, all opponents are attacked strongly |
| Electric (Unlocked on level 19) | Metal | Electric Dark | Electric Jolt (Offensive) | Deals extra damage to another or all opponents | Burnout: Removes good effects from target opponent | Power of Thunder: Chance that the target opponent will be stunned for 1 turn |
| Void (Unlocked on level 25) | Electric | Void Light | Life Steal (Offensive) | Steal health from target | Pay it Forward: Stolen health is given to all allies, not just the attacking ally. | Dark Ritual: Hit an opponent that has good effects to steal their oldest effect for its remaining duration (no longer than 2 turns) |
| Light (Unlocked on level 35) | Earth Wind Electric | Light | Solar Flare (Offensive) | Works like explosive results, but attacks are much more powerful | Dazzling Aura: Chance to stun the attacker for 1 turn when struck. This is a passive skill, meaning it is always active (not something you cast) | Healing Light: Chance to heal all allies when caster hits an opponent |
| Dark (Unlocked on level 44) | Fire Water Plant | Dark | Creeping Shadows (Offensive) | Works like poison over 2 turns. Damage inflicted is based on the target’s attack strength, not the attacker’s strength. | Frightened Speechless: 50% chance to stun the targeted opponent for 2 turns | Shade of Oneself: Works like Dark Clouds |
| Legendary (Unlocked on level 5) | Light Dark | Death Mark (Offensive) | Target takes extra damage from direct attacks, over 2 turns. | Heroic Healing: When an opponent is struck with heroic healing, and ally that attacks that opponent after that will be healed | Heroic Duel: When an opponent struck with heroic duel attacks the ally that struck them, the ally will fight back and cause even more damage to the marked enemy. | |
| Divine (Unlocked on level 5) | Light Dark Earth Fire | Wisdom of the Ancients (Defensive) | Target all has greater health and greater attack strength over 2 turns. | Great Blessing: Targeted ally does 60% more damage and gets 80% more of its original health for 3 turns | Mass Blessing: All allies do 50% more damage and get 50% more of their original health for 2 turns |
What does this mean? (Dragon Training)
A dragon can train in one of these skills if it has that skill’s corresponding element. For example, a smoke dragon (fire / wind hybrid) can train in both explosive results (fire) and dark clouds (wind). Each time they train that element, their skill level will increase. A dragon who has not trained at all will not be able to use that skill with their attacks. A dragon who has trained their fire element once will have level 1 fire, and so on. Train your dragons in the Dragon Academy (which can be rebuilt after saving Professor Hogwin in Quest #5) using scrolls (found throughout the campaign map and as prizes in other chests). Note that you can only train up to whatever level your academy is (so if your academy is level 3, you can only train your dragons up to level 3 in each element), so keep upgrading! Dragon skills make battling a lot easier and more strategic! After level 5, you will get to choose between added option 1 and added option 2 (the mastery skills) for your dragon. Once one is studied, your dragon will be considered a master in that element. The higher the level it is, the more expensive it will be to train your dragon.
Resistance & Weaknesses
Each dragon is categorized by their predominant element, which is the first one listed on that dragon. For example, the mud dragon’s predominant element is Earth, because its elements are listed Earth then Water. Snow, on the other hand, has Water as its predominant element, because its elements are listed Water then Earth. We’ll get more into that in a second.

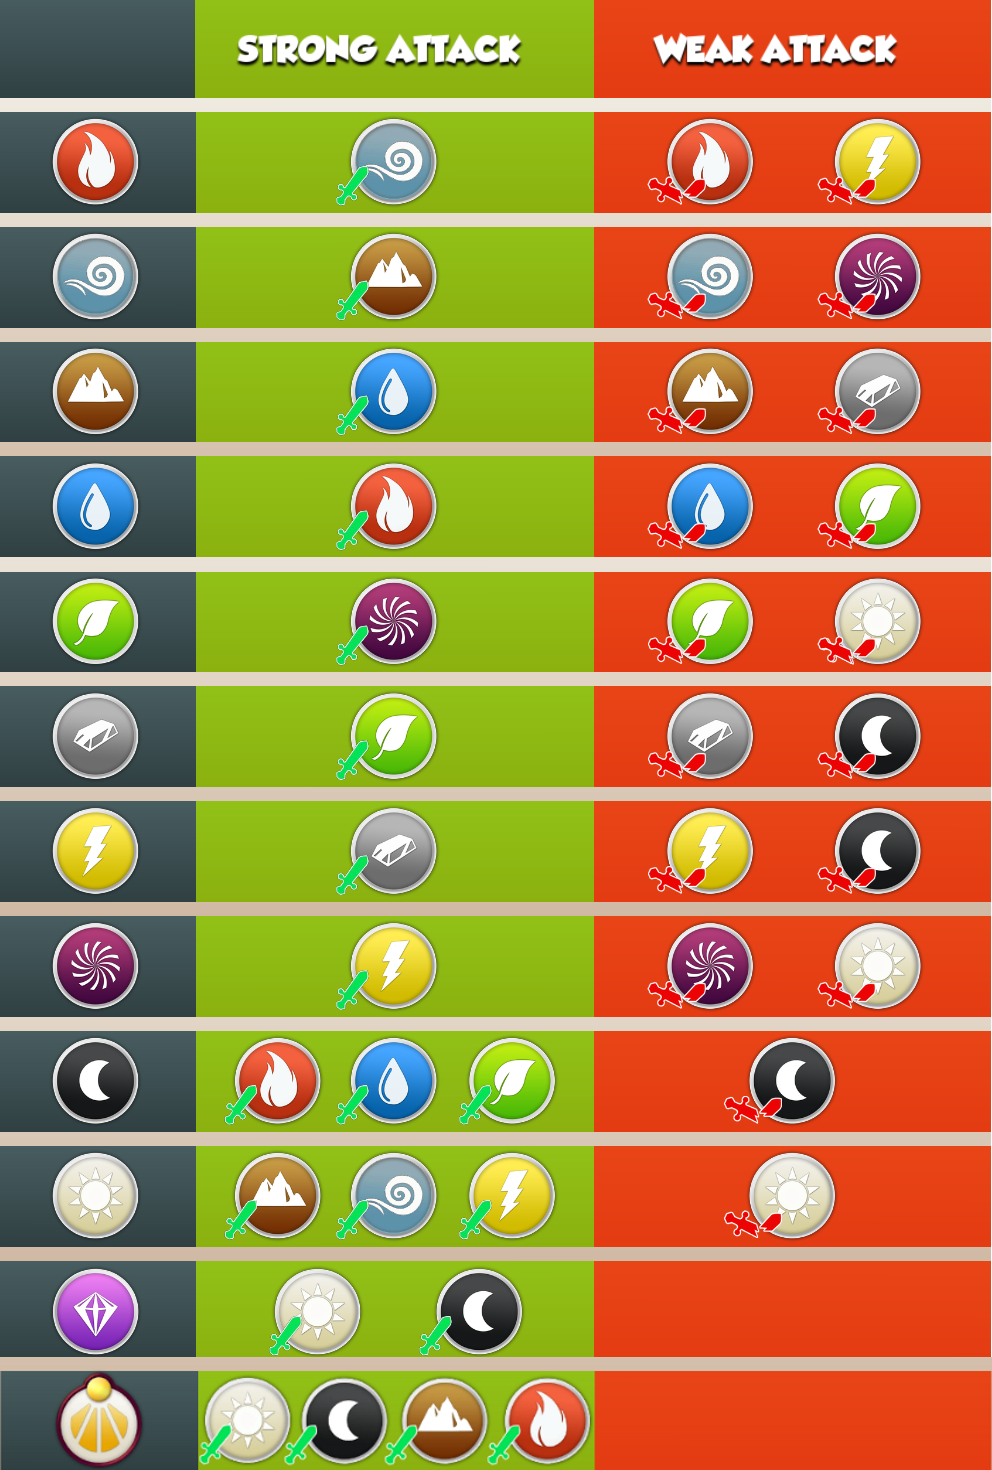
The strengths chart shows what each element is strong over when attacking. This is where predominant elements come in to play. For example, using a light (at the top) attack will be strong over dragons with the predominant elements wind, earth, or electric. You can also use this chart to think what elemental attacks will be more powerful over your dragons when used.
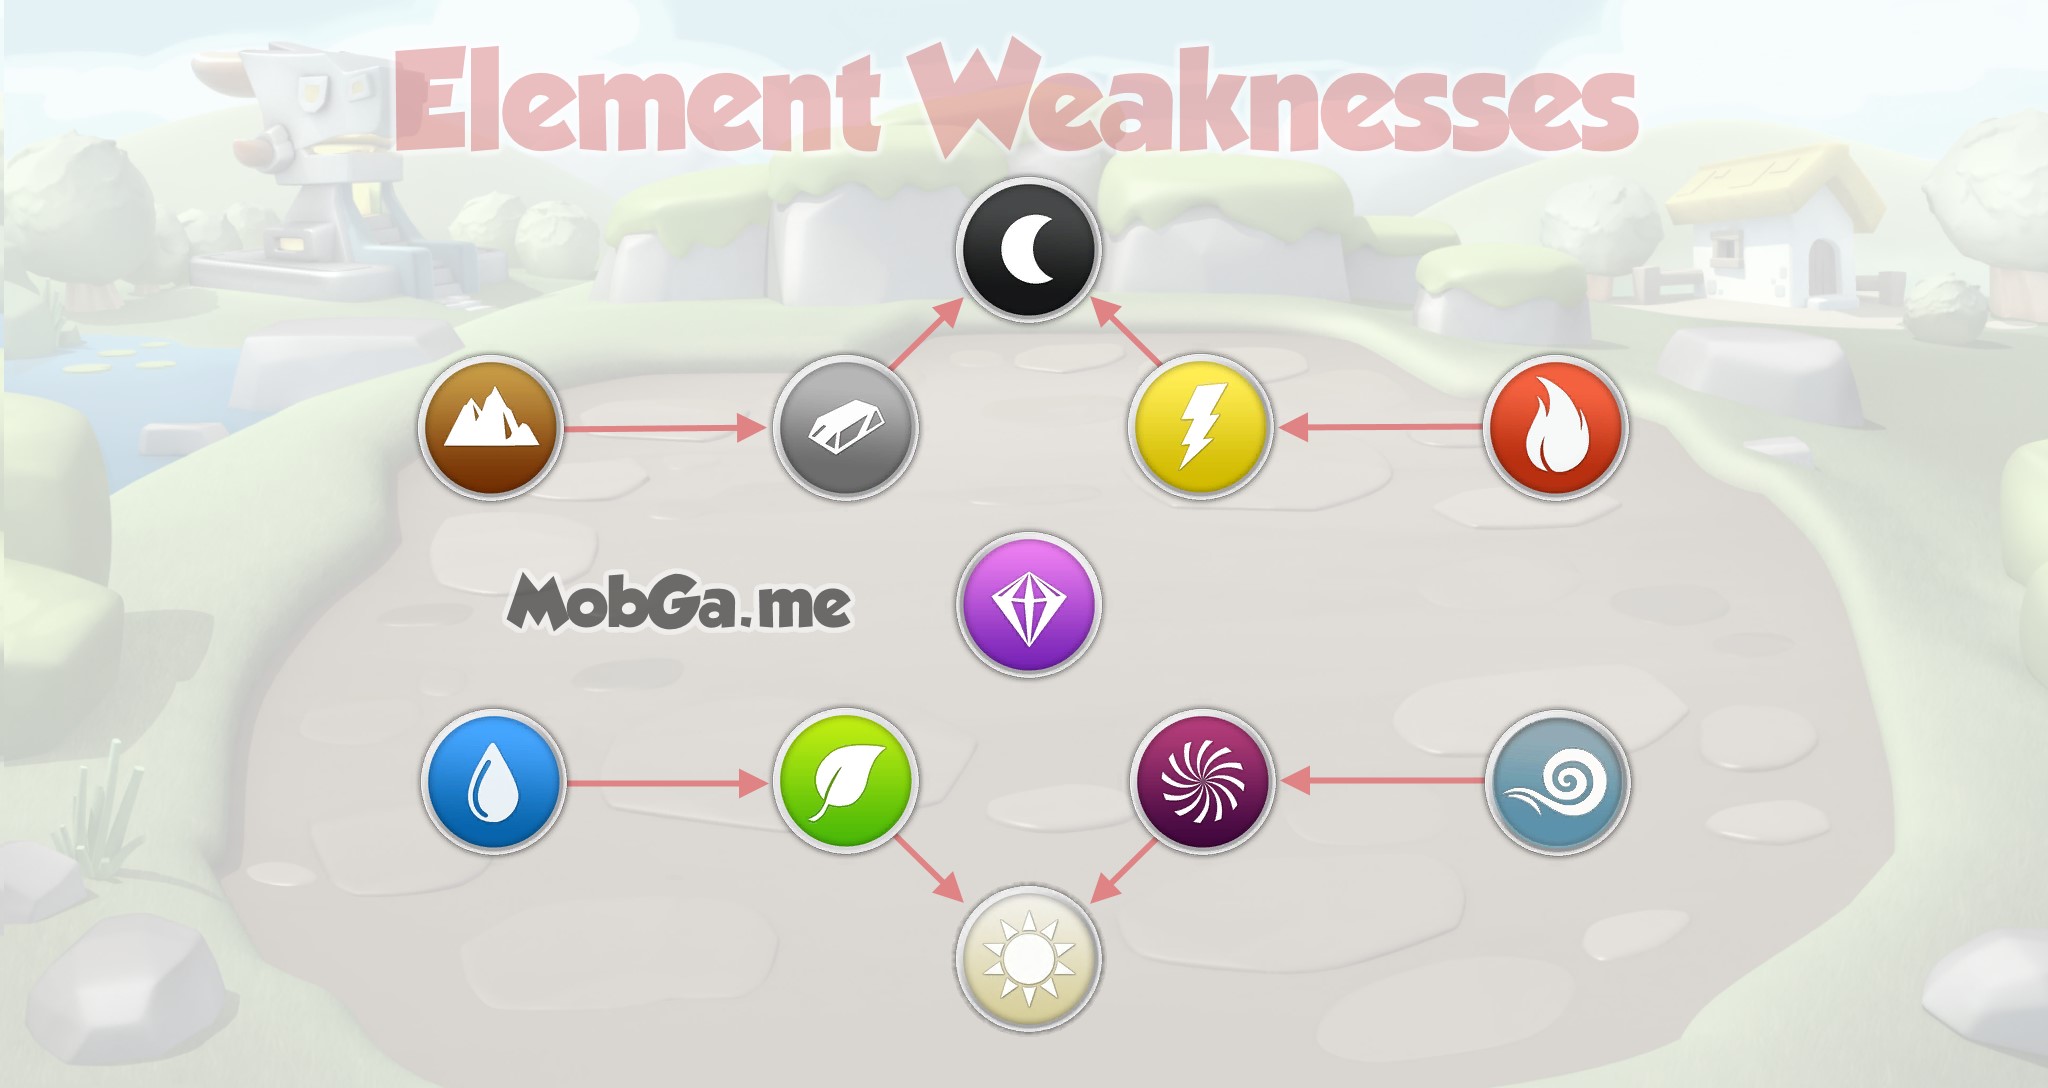
The weaknesses chart shows what each element will be weak over when attacking. For example, an earth (on the left) attack will be weak against a predominantly metal dragon. Elemental attacks are also weak against a dragon with the same predominant element as the attack. For example, an earth attack is weak against a predominantly earth dragon. These are the charts the game used to use, but now they just have an organized list that is easier to read (which also includes the divine element.) This list can be accessed in-game by tapping the green “i” button after choosing a team to fight.:
Within a battle, on your turn to attack, if you select an element, the ground underneath your opponents will tell you if the selected element will have a strong (green, whole sword), weak (red, broken sword), or neutral (yellow, no sword) effect on each dragon.
Step 2: Prepare your Teams
At the start of the game, you need to prepare at least 1 team of dragons that are purposefully stronger than your others. They should work well together, be fed and leveled-up often, and be trained in each of their elements, as explained in step 1. The further you go into the game, the more of a need you will have for extra backup teams. These will be helpful in places where your main team will either not be strong enough elementally, or not have enough energy to do multiple battles, like in dungeons and enchanted battles (more info on both in step 3).
So, which 3 dragons should compose a team?
A general team should have general elements. I recommend having at least 1 water element for healing, and at least 2 earth elements for shield (in case one dies). Other elements that are good to have on hand are plant (because poison can get you that little extra that’s just enough to kill them), metal (because it’s strong against plant-predominant dragons, which are a pain to deal with), air (because it can weaken a stronger opponent’s attack), and fire (because it can finish off several if need be). Of course, all elements are helpful in their own way. You’ll want to find dragons that incorporate as many different elements as possible, meaning that dragons with more elements will be more valuable in a team.
A great beginner-friendly example team with fire, wind, earth, and water is the Snow dragon, Cloud dragon, and Lava dragon. This gives you 2 stone shield providers (earth), 2 healing providers (water), 1 weakener (wind), and 1 all-attacker (fire). Other 2-element substitutes include the Dust dragon (wind and earth), the Bee dragon (fire and wind), and the Ice dragon (wind and water). Any dragon with wind as its predominant element is vulnerable to fire, which can be very dangerous, as it hurts the whole team when used to attack that one dragon. Note that there are also 3-element dragons that appear early in the game that you can use, such as the Tribal dragon (fire, earth, wind) and the Prairie dragon (earth, wind, fire) that could be added instead, and plant should be incorporated as soon as it’s unlocked. (The best recommended plant dragons to add are the Leaf dragon (plant, wind), the Candy dragon (plant, water), the Faun dragon (plant, earth), or any other dragon with Plant as its predominant element because its only real weakness is metal).
In the future, you’ll want to start training individual dragons that aren’t part of a team, as they may come as a handy “replacement” for single-elementally-focused opponent teams.
What does that mean? Well, you have your main team(s) that are composed of dragons with many different elements, so as to take on a wide variety of opponents. But, you will eventually come across an opponent team that has one or two elements as its main focus, instead of having a variety. For these cases, you’ll want to know how to assess your opponent’s dragons and choose which individually trained dragons would be the strongest. It probably isn’t your predetermined team! (But no worries, this isn’t a concern until you’re pretty high in the game).
How to assess your opponent’s dragons and your own teams:
Before battling, you will get to see all of the dragons you are going to go up against. How do you assess which of your dragons or dragon teams would work best? Easy: First, look at each enemy dragon’s first (predominant) element. Using the chart, find that element under the “strong attack” column and find which attack is required. The dragons you use should have at least one of that element to use. For example, if one dragon’s first element is earth, you will need wind as a strong attack. Next, look at which elements appear in the opposing team most often, then find those in the first (gray) column and see what they’re strong against. You should avoid those as your dragons’ first (predominant) elements. For example, if two or three of the enemy dragons have fire, you’ll want to avoid using dragons whose first element is wind. What would you do if both of these scenarios happened at the same time (where you need wind as a strong attack, but should avoid wind as your first element)? Simple! Pick dragons who have wind, but not as their first element. The more individual dragons you have trained, the easier picking and choosing the perfect fits becomes! For now, you may just want to stick with your original teams.
ALSO NOTE: The arrangement of your dragons when you go into battle is important! You can tap “select” under each dragon’s profile on a battle page to change which dragon goes where. The dragon listed first on the furthest left is the bottom dragon, middle is middle, and right is the top. I recommend putting a protector (with earth) and the bottom and a healer (with water) in the middle.
Some general dragon-keeping tips:
- Plant food often and keep feeding dragons. Focus on leveling up one dragons at a time.
- In a team, the dragon you want to be the strongest or most important (the healer, for example) should be one level ahead of the others at all times.
- Always go exploring for chances to find more food, and explore or pet dragons for money to build and upgrade your farms!
- The more you plant and the more you wait, the more worth it it is! Plant large crops instead of small ones.
- Never forsake side-quests on the campaign maps. Get 3 stars on them to get scrolls to train your dragons at the academy.
- Focus on upgrading and training dragons at the academy constantly. Only send dragons into battle if they at least have level 1 of each of their elements.

Step 3: Go into Battle!
Once you’ve got your team picked out and you know what you’re doing element-wise, it’s time to fight!
Here’s some main pointer tips for traditional fights:
- Keep a stone shield up (with earth) at all times, starting with your first move, if possible. Don’t waste unnecessary turns on re-applying shields, as it will throw the duration off and one or two dragons will be left unshielded, putting one dragon providing shields every turn and not fighting at all.
- Heal (with water) as soon as any dragon gets down to half-health, especially if they have been poisoned, were not the direct target of the stone shield (showing only one shield symbol instead of two), or the next opposing dragon has an element that is strong against them. It’s better to take the time and heal now, once, instead of getting trapped in this never-ending-healing-loop once one dragon gets down too low for comfort.
- Try to take out opponents one by one, instead of all at once, starting with lower-level dragons and dragons with trained earth or water. Lower-level dragons are easier to take out, and having less opponents is a lot easier to deal with. Taking out the earth-and-water-trained will avoid pesky opponent shields and healing. Wind, plant, and void are the elements you should target after water and earth.
- Try your hardest to get perfect hits and save up for that dragon fury, unless you desperately need this last hit to kill an extremely dangerous dragon. Then it may just be better to play safe.
- Once a dragon fury is earned, you may find a better time to use it. If it’s a classic fight, use it as soon as possible. If it’s a dungeon, where opponents come in waves, save the fury for the start of the next wave to automatically weaken the second wave of opponents. When using the fury, try swiping to hit all the dragons, not just the one you think needs the most hits. Chances are you won’t get as much out of your fury if you just aim for one.
THE PLAY BY PLAY!
If you read the extra note at the end of step 2, you should have arranged your dragons with earth at the bottom and water in the middle. If you did, the play by play should go like this:
- Apply stone shield to your weakest dragon if your best dragon was trained beforehand (trained as in you tapped them, hit “train,” then shot at the little viking plushies and now their head is glowing). Apply to your best dragon if not.
- Now it’s your middle dragon’s turn! If they can take out your opponent’s middle dragon in one shot, do that. If not, if your middle and top dragon can take out your opponent’s top dragon, do that. And if not that, aim for the opponent’s bottom dragon. Basically you’re trying to take out whatever dragon you can take out before it’s that dragon’s turn.
- Follow through with the plan of knocking out whichever dragon you shot at before.
- Next aim for the weakest dragon, or the dragon with trained earth or water. If the opponent has stone shields applied, aim for the one with only one shield icon, not two.
- The second time the turn rolls around to your first dragon, the shields should disappear. Reapply them to your weakest (in health) dragon, or to the same dragon it was on before (as the opponents may only not be aiming for that dragon because of its second shield). Remember to HEAL when any dragon’s health gets down to half! (If the decision is ever between healing mainly the healer (water) or the defender (earth) when both have equally-bad health, heal the healer!)
- Attack the opponents from weakest or most annoying (trained earth or water, then plant, wind, or void) up! You will end on the strongest dragon, which you may now have a dragon fury to use against.

What about enchanted battles?
Enchanted battles are very different than traditional battles! They are unlocked when you get 3 dragons up to level 16. When this happens, a tutorial will appear, allowing you to enchant your top 3 (level 16) dragons for free. Dragons from then on must be level 16 before they can be enchanted, and dragons must be enchanted to opponents in an enchanted battle.
Basically what happens is each player (including yourself) will set up a base, where they can add defenders at these little towers. Attacking players will have to defeat each of your defenders one by one, without being able to see what dragons come next. When you attack, you will choose one dragon to fight the attacker. Then you sit back, relax, let them hash it out, and go until either you forfeit (and lose) or all of their defenders are defeated and you make it to their home tower (and they lose). In these battles, you will need to consider the defender’s level, first element, and available elements. You’ll want to pick a dragon with a close, matching, or higher level, an element that is strong against their first element, and whose first element is not weak to any of their elements. (The game will automatically make both dragons use strong attacks if possible). You can also use effects, but these should be used sparingly and wisely. Always check to see what the opponent’s highest dragon is before entering the battle, as often times it will be way out of your league.
Setting up your own defense in the enchanted league
There are many different tactics to setting up your own defenders. For one thing, you should note that defenders do not have to be enchanted to defend you towers. Simply select a tower and a dragon you want to put there. Attackers will have to come from the bottom and work their way up. Some people arrange it to where their defenders get increasingly stronger, with the strongest at the end. This is probably the smartest, although another option is to put the strongest second to last and one of the weaker ones at the very end. That way the strongest can wear the attackers out to where they don’t even have enough health to take on the last. Either option is good. I definitely would not recommend putting the hardest and the beginning and working back down, although you may find a better way to make putting the strongest at the beginning work. I haven’t experimented with it much yet, but when I do I’ll be sure to add the info.
That’s all!! Hope it helped!!
